
Friday, July 31, 2015
Washi Christmas
I had to work on a card with Washi tape and since it was still during Christmas in July I made it Christmas. I used 3 different washi tapes from my stash, the ribbon as well as the wreath & merry are SU, the Christmas is part of an Impress stamp

Thursday, July 30, 2015
Shoebox Thursday
Today's shoebox was from Linda and she really got us working on this one. The only difference from her sample was I added a layer with the embossed as I don't care for the feel or look of the embossed when you open card :0) and she has added some punched flowers as she had already glued her brown piece and not a smooth surface to stamp, most of the other ladies added the tiny flowers plus the punched flowers I decided to just do the tiny stamped flower
Embossing folder is Darice everything else was SU. Pretty card for any occasion

Embossing folder is Darice everything else was SU. Pretty card for any occasion

Wednesday, July 29, 2015
Shoebox Tuesday
At this month's SU club they were working on paper molding but not the kind I knew. So talking to my friends they wanted to know the way I knew it so I showed them how to do it as I remember from 100 years ago :0) .


I made these the other day so they could be ready for today. Here is as this one was drying

and this is how it ended up after it dried.


now they just need trimming and color with chalks but I don't have chalks any more :0) it was just for showing how it was done not that I was actually going to use them :0)
At first they were just going to play with paper casting/molding but then thought they were not going to be able to actually do much as it takes time to dry so I decided to also have this project for them. It's the last shoebox in July and of course my last Christmas in July card :0)
The tree is part of SU's lovely as a tree, message in English is by Sweet Impressions and the one in Spanish is by Good Stamps Stamp Goods, the border edge punch is by Martha Stewart and the embossing folder is Cuttlebug. I was going to do the rock n roll technique BUT my OCD always kicks in so what I did was color the tree with the light green ink pad and then use markers to do the rest of the coloring...darker green around the whole tree, brown for trunk and very dark green for the ground. Pretty much same look but without contaminating ink pad :0)


Tuesday, July 28, 2015
Christmas/winter
This is another of the kits I found. This one was also from around 2010 although I couldn't find any of the stamps on their catalog so it might be earlier than 2010. Since all was already prestamped and had the strips of paper but didn't know how the card was done I did what made sense :0)...fuzzy cut trees, glue the strips to the snowflake piece then to the black, red & white, add trees randomly and added the snowflake brad :0)


Monday, July 27, 2015
Honey day
While I was rearranging a box in my craftroom I found a lot of images and pieces that just needed to be put into cards so that is going to be my project for a while.
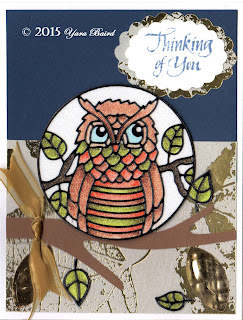
In between those I found two kits of cards that we did at SU club at least 5 years ago. I think I didn't finish them my guess because there was coloring and fuzzy cutting so decided to start with that. As I mainly color with Copic Markers I started doing that and even after 5+ years SU ink is not compatible with Copics as it bleeding. I would have thought after all this time it would be safe but not so much so I only colored the honeycomb and tossed the bee and flower image and looked for something to add and found these charms in my stash. Since I didn't find a photo of how the card looked I just did my own thing :0)


Sunday, July 26, 2015
Birthday card
I love using embossing folders they seem to give a lot to a card with the least amount of work :0) these were clean and simple cards and quite easy as I used Michaels stickers


These two are Cuttlebug folders


and this one is Darice embossing essential

Saturday, July 25, 2015
Friendship
This is another card using the Tilda Twins because it was done a while back when I was coloring with prisma pencils. The flowers are from a Martha Stewart border punch just cut them apart


Friday, July 24, 2015
Krazy Kreations frog card kit
This is another card kit that finally got done. Also was glitter paper, peel-off stickers and colored with Copic Markers. It made 3 cards


Thursday, July 23, 2015
Shoebox Thursday
Today is my turn for the shoebox and continuing with Christmas in July I had another Christmas card for them. What I did was die cut all pieces and have them do their puzzle :0) no card would be the same and they get to choose their orientation and where to stamp message.
The snow drifts is a My Favorite Things die, the trees is a Poppy Stamps / Memory Box die. The message in English is Hampton Art Stamps and the one in Spanish is custom made


The snow drifts is a My Favorite Things die, the trees is a Poppy Stamps / Memory Box die. The message in English is Hampton Art Stamps and the one in Spanish is custom made


Wednesday, July 22, 2015
CTMH card kitt
This is the other CTMH card kit I got by Michelle. It also had supplies for 4 cards
For this card was fuzzy cut the butterflies that I believe were paper not stamped images


For this card was fuzzy cut the butterflies that I believe were paper not stamped images

This one was adding the heart to cup and cut the banner

This one was just put together but I decided to round the corners

For this last one was just put together. Love the balloons and the paper is sort of embossed with different designs...I turned it to the "z" fold to the other side as the background papers were double sided and I like some designs better than others :0) I was hoping the balloons were a die but it's a Cricut cartridge.


Seems like a lot of CTMH stamps match the Cricut Cartridges
Tuesday, July 21, 2015
Shoebox Tuesday
For this week's shoebox I made another Christmas card. I had been wanting to use this Darice folder but wasn't sure what to do with it as coloring wasn't an option. I saw a card on Pinterest that thought it would work. I used SU's ticket duo & owl builder punches, the messages are Rubber Marbles the one in English & Stamp-A-Mania the one in Spanish.
I embossed the piece in white then small pieces in red for legs/pants and black for boots. The legs and boots were fuzzy cut and adhered onto the white piece then added the chimney, and gift bag. I added texture on the bricks by using some distress ink with crumpled paper towel...doesn't show too much on photo


I embossed the piece in white then small pieces in red for legs/pants and black for boots. The legs and boots were fuzzy cut and adhered onto the white piece then added the chimney, and gift bag. I added texture on the bricks by using some distress ink with crumpled paper towel...doesn't show too much on photo


Monday, July 20, 2015
CTMH card kit
I don't know if CTMH does these kind of kits all the time but this year when we were at the Heirloom Convention we noticed them. I got two. The kits included everything to do 4 cards...including the images which was nice. All you had to do was put together
This is the first kit by Wendy. On this card I just had to add the hexagon, the faux stitching as I wasn't doing to do actual stitching colored the butterfly with Copic Markers and fuzzy cut it


This is the first kit by Wendy. On this card I just had to add the hexagon, the faux stitching as I wasn't doing to do actual stitching colored the butterfly with Copic Markers and fuzzy cut it

For this it was do the faux stitching, cut banner and adhere the pieces

This one...perfect example not to follow the hives as they're not straight LOL do love the tiny hives and the matching pieces...also had to do the banners

This last one was gluing the hive piece to the yellow piece cut some pieces and glue to base card that already had the stamping and I colored the bees with Copic Markers and added Wink of Stella for the wings and tiny pearl as eyes

Sunday, July 19, 2015
Sunday Tip or Technique
One of the tip or technique was reflection on water using acetate but of course I had to do something different :0) instead of acetate I use the acrylic for the stamp positioner which I figured it was the same...since I didn't try with acetate guess I have to assume it does LOL
My image wasn't as clear as the tutorial I watch but since images on water are not clear I was good with the result :0)
The stamps are all in one set by Local King Rubber Stamp colored with Copic Markers, the sky as well as the water was done with stamping sponges and Memento Ink

My image wasn't as clear as the tutorial I watch but since images on water are not clear I was good with the result :0)
The stamps are all in one set by Local King Rubber Stamp colored with Copic Markers, the sky as well as the water was done with stamping sponges and Memento Ink

Saturday, July 18, 2015
Krazy Kreations owl card kit
This kit was for 4 cards but had enough to made 6 cards. Again all done with glitter paper, peel-off stickers and colored with Copic Markers


Friday, July 17, 2015
Krazy Kreations fashion ladies card kit
Another kit done with glitter paper and peel-off stickers colored with Copic Markers. These cards were about 5x7 and supplies were just for 2 cards


Thursday, July 16, 2015
Shoebox Thursday
For today's shoebox project Candee had this thank you card for us. All supplies are SU. From original card I just changed the size of some of the pearls I thought it worked out better if it was a bit bigger than the teeny tiny one :0)


Wednesday, July 15, 2015
Krazy Kreations sea shells card kit
One more of the kits. Also done with glitter paper and peel-off stickers as well as colored with Copic Markers. With this kit you had supplies for 4 cards


Tuesday, July 14, 2015
Shoebox Tuesday
Continuing with Christmas in July for today's shoebox project I made this card. The poinsettia stamps are by DeNami Designs and the message is by Morning Star


Monday, July 13, 2015
Krazy Kreation wild west card kit
This is another of the kits I got. Also done with glitter paper and peel-off stickers then colored with Copic Markers. This one made 3 cards. Most of these kits are doing 5.5 x 5.5 cards but I always changed the card to regular A2 to A7 as the square cards cost more to mail in the US


Sunday, July 12, 2015
Krazy Kreations circle flowers card kit
This is one of the kits I got at the Scrapbook Expo.
The kit came with everything to make 3 cards. It's done with glitter paper and peel-off stickers then color with Copic Markers

The kit came with everything to make 3 cards. It's done with glitter paper and peel-off stickers then color with Copic Markers

Saturday, July 11, 2015
Wet lands
Can you tell I use this stamp set a lot? I think you can do lots of cards mostly manly which is always the hard theme for most people. Also love black & white


Friday, July 10, 2015
Shoebox Thursday
For yesterday's project Kathy had this cute card. Sorry don't recall who made the message stamp and everything else was pre-done for us my guess they were SU punches :0)
From the original card I added pearls for the eyes, also added a couple legs on the part that was lower and I added a bit of color on bottom to ground the worm

From the original card I added pearls for the eyes, also added a couple legs on the part that was lower and I added a bit of color on bottom to ground the worm

Thursday, July 9, 2015
Panda
One of my favorite animals is panda bears they cute and seems so adorable :0) so for one of my mingles I used this Stamp Oasis stamp that was a gift and hadn't been inked.
I had been teaching my girlfriends how to do the different step cards so wanted to do this with a step card but I did a twist that only because I saw someone in Pinterest do that I would probably have not think about it. The card itself is about 3-1/4" x 4-1/4". The embossed part is from a Sizzix texture impressions embossing folder, the messages is SU's petite pairs set and did the little bit of coloring with Copic Markers

I had been teaching my girlfriends how to do the different step cards so wanted to do this with a step card but I did a twist that only because I saw someone in Pinterest do that I would probably have not think about it. The card itself is about 3-1/4" x 4-1/4". The embossed part is from a Sizzix texture impressions embossing folder, the messages is SU's petite pairs set and did the little bit of coloring with Copic Markers

Wednesday, July 8, 2015
Cute Kitty
For another mingle I made this card with images I had colored very long time ago. I cut the classic screen door die by Poppy Stamps in brown and craft paper then put "screen" mess in between both pieces and glue to base then stamped SU's woodgrain background and the messages the thinking of you is by Sweet Impressions and the happy birthday is Stamps by Judith. The cat is part of a Local King stamp set colored with Copic Markers. I tried to cut with matching die but it is not a matching die so ended up cutting around it to even the bad die cut.
 No matter how much I tried can't really see the screen on photo :0(


Tuesday, July 7, 2015
Shoebox Tuesday & Sunday Tip or Technique
Since we are in July and I like Christmas in July for today's shoebox project I did a Christmas card which also ended up being one of the Sunday Tip or Technique. Criss cross card fold
I don't really care about the glued pieces so my card was base 4-1/4" x 4-1/4" which made the card itself 4" x 12" scored at 4"& 8". I used ornamental pine stamp set for the background, the front message is by Stampa Rosa and I don't know who makes the inside message. I also used mitten builder punch by SU


I don't really care about the glued pieces so my card was base 4-1/4" x 4-1/4" which made the card itself 4" x 12" scored at 4"& 8". I used ornamental pine stamp set for the background, the front message is by Stampa Rosa and I don't know who makes the inside message. I also used mitten builder punch by SU


Subscribe to:
Posts (Atom)