Friday, October 31, 2014

ShoeboxThursday

This week's shoe-box was different Linda gave us the main part of the card and we all had to come up with a card for her to keep so these are the cards we did

Kathy's

Jen's

Candee's

Jean's

Darlene's

and mine

Also because we had to come up with the card from her supplies while we were there we didn't have a time set, it was just finish a card :0

Tuesday, October 28, 2014

Fall

Good news I didn't break any bones! will have to deal with extra pain for a while but other than that doctor said I'm good.

These are the other cards I made with the same stamp set, papers & Fresco chalk ink

On this one the part embossed is a folder by Cuttlebug

and these two I used Martha Stewart ribbon


Saturday, October 25, 2014

Frappucchino bottles

Today we got to see Santa. Since my hands weren't well enough I couldn't do my projects but got everything to work on them as soon as I can.


I had about 120 empty frappucchino bottles to give away but only got rid off 48 as the other ladies didn't know what they could do with them so I decided to post what I have done and a couple that were gifts. Maybe I can get people interested in these bottles otherwise they'll be going to the recycle :0)

This was the first time I have seen using this idea. Liz had a Stampin' Up  Retreat which I join just the last day. This was one of the projects

This one was a gift for the baby shower of a cousin-in-law


These two were gift. Candee had been the recipient of my bottles and she did these for a Christmas Bazaar


This one was for St Patrick's day, I know I should had taken pictures when they were full of candy or cookies :0) I got the hats at JoAnn Fabrics


For this Easter one  I bought the little box of eggs at JoAnn's it came with assortment of colored eggs so I gave my friends their favorite color and it was full of cookies, The egg is glued to moss


This one for 4th of July were used as a party favor. The hats are from Hobby Lobby and the ribbon from Michaels


These two were different years for Halloween. The mason jar is a die by either SU or Spellbinders


This one was for Día de Reyes or Epiphany. The embossing folder is by Cuttlebug


This one I was just playing around and wrapped twine around it. Thought it would make a nice manly gift


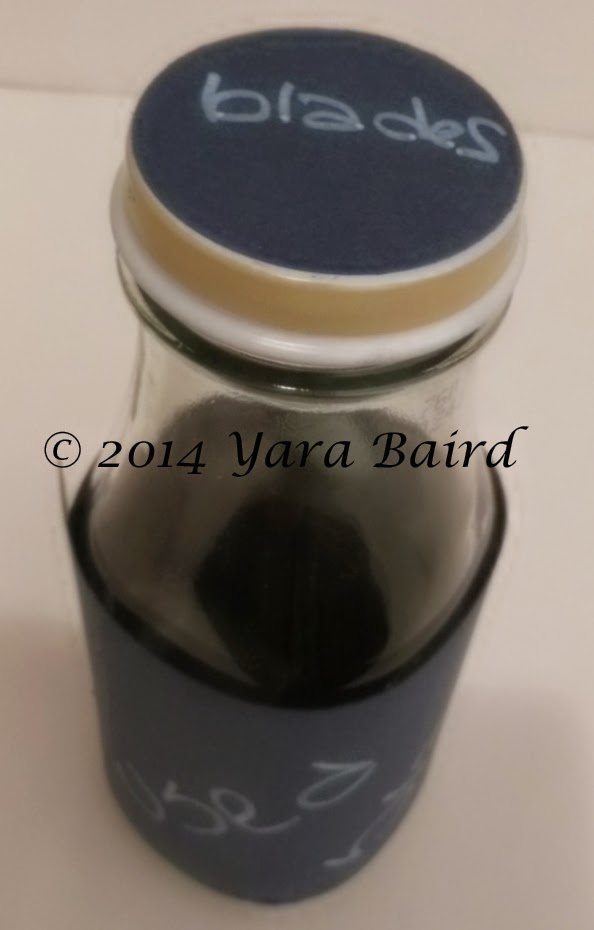
Last but not least since I had too many bottles when I redid my craft room I decided to use some as organizing containers. I label on top, the circle punched was with color (mostly the color of what was in)  and then I printed what was in and punched out with scallop circle this way I don't have to get the bottle out of the box to see what's inside. Also I label on the bottle itself with company's name and product with ID # so I know what to put on my recipe :0) It works great for candy dots, flower soft, paper flowers and any other embellishment. I love the fact they're clear and all the same color :0)


I also made one for my used blades. Since you can't just drop your dull blade on the garbage I decided to just keep in here and when it gets full I can safely dispose of the blades without problem that someone might cut themselves :0) 


I have done others but didn't keep a photo :0) normally these bottles are gifts specially as Thank you for my sister & Brother-in-law and just because for Bret


Thursday, October 23, 2014

Shoebox Thursday

My right hand is better just a little swollen towards my thumb but left hand still swollen enough that is hard to do things.

This week was my turn for the shoe-box and from all cards I did I had to go with this due to my little accident. I used the same SU stamp set as on the other card I showed couple days ago. The message is from a set by Heartfelt Creations. Also, used Fresco chalk inkpad and the scan doesn't show but used Radiant rain Shimmer ICE mist


Wednesday, October 22, 2014

Stampin' Up Club

I was just finishing up with this month's club project when I had a little mishap so unless the swelling in my hands get better I probably won't be able to work on cards for a few days.

We made 4 projects this month. The first was an ornament but you know me and 3D projects, I like them but don't have a use for them so this was the original project


and this is how I finished mine :0) due to the size of the star the card is square 5-1/4"


The second project was a clean and simple fall card

This next project was another 3D project. A tag for a wine bottle do to its length it doesn't fit anything shorter than a regular size bottle...it was even a bit long for it but not too bad

This is closer look of the face, it was needing something so

I added some white on his eyes and look more real :0)


Because it's black on the other picture you couldn't really see that the tag itself was embossed


The last card was a Christmas scene. I colored it with Copic Markers


Tuesday, October 21, 2014

Fall

I was working on my shoe-box project and ended up making 3 cards with the same set I'm in between two cards now so this is the 3rd card :0)

I like all 3 cards BUT since I only have one stamp set need to think what would work for a faster rotation as we have an hour to get the project done...it never seems to work in that time due to limited supplies and of course not everyone has the same pace. Some of us try to cut & emboss as much as possible but still when it comes to stamping we all have to wait our turn.

The stamp set is SU and I used Fresco Chalk inks. The embossing folder is Cuttlebug


Monday, October 20, 2014

Class in the mail

I got together with some friends and we work on this card kit by Frenchie Stamps. Like always I made some changes but the general idea is pretty much what she did :0)
This kit was 5 cards, they are probably good for any gender. The kit comes with the stamp set, all the papers and embellishments, all you need to do is stamp and put together. Since I only have a hand full of  SU ink pads most of the ink that was used was Memento.

This first card wasn't very happy with the end result. The frame kept bugging me :0) We were supposed to hand-draw a frame and since I was a little off decided to totally made it off so it would look that it was intentional :0) anyway I just didn't like that frame so I re-did the card front omitting the frame. having the paper precut I had to eyeball the butterfly or use stamp positioner but didn't work that good...not too even around. I think it's best to stamp then cut, I understand that since not everyone has all dies and punches it's necessary to get the pieces punch or die cut so we can just stamp, might be hard but when you have to be 110% careful to get an even border and some images no matter how much you try it just never happen or maybe it's just me :0) The inks I used was Sahara Sand & Sweet Plum


Anyway this is my end result which I like more. Also added some pearls by Recollections


Since I have the butterfly punch I decided to make a two-butterfly to give it a little dimension. (sorry for the blurriness but either my hand wasn't working right or my eyes as no matter how many picture I took they were all the same :0( )


This next card the inks were London Fog & Teal Zeal, again added some pearls to the butterflies, the ribbon was supposed to be attach with staple BUT I don't care for that so I made a knot off center and added a glue dot to keep in place


the banner was curved so it has some dimension


For this card we used Teal Zeal and Angel Pink. Since we had to color the ribbon with the ink pad and from experience it takes over 24 hrs to dry and not all ribbons work or once again it's me LOL I decided to air brush it with Copic Marker RV63. The downside is that the ribbon got a little stiff to work so I changed the way it was attached. Some more pearls


 This is my favorite card from all, I think it's the colors. Since I didn't have craft white ink I used Brilliance which gives a little shimmer to it, and the other ink used Tuxedo Black.


More pearls. The middle butterfly the pearls covers the excess adhesive from gluing the super thin bow


This last card was supposed to be a shaker card with sequences BUT since I don't care about the sequence unless I'm sewing something to fabric :0) anyway I decided to make the card pretty much the way it was BUT with out the shaker part. I thought of adding acetate with the message but the color I wanted to use was Bermuda Bay and it was running so I just stamped the message straight.on the cardstock. Beside Bermuda Bay I also used Cantaloupe & New sprout


added a second butterfly to give some dimension as well as adding some pearls


Friday, October 17, 2014

Designer's paper

Guess this week Candee and I had the same idea...the use of designer's paper as the main part of the card. I was having a hard time creating lately so surfing I came up with a tutorial -sorry to say I don't remember who was doing it - anyway it was something about it's about the angle so I went through my stash of background papers and you know when you get the pad there are all those papers you can't really use on a card because they're too busy or the pattern is too much well I thought this technique or way of making a card was the perfect solutions. Pretty much you do your card base the same as always...any size works but this is the regular A2, either 8-1/2 x 5-1/2 or 4-1/4 x 11 then you cut your layer 5-1/4 x 4. The you decide where you want to cut your angle and violà. I think you can cut your paper even smaller and just continue the design so you don't really waste the piece you cut off anyway this is what I came up with


The paper was from a pad by K & Company, the message is from a stamp set by My Creative Time stamped with Memento ink rich cocoa. Flowers are by Recollections I believe.
Technically if you do this technique with this size you can get 6 cards out of one sheet and waste about 6 inches give or take that you could probably use for another card :0)